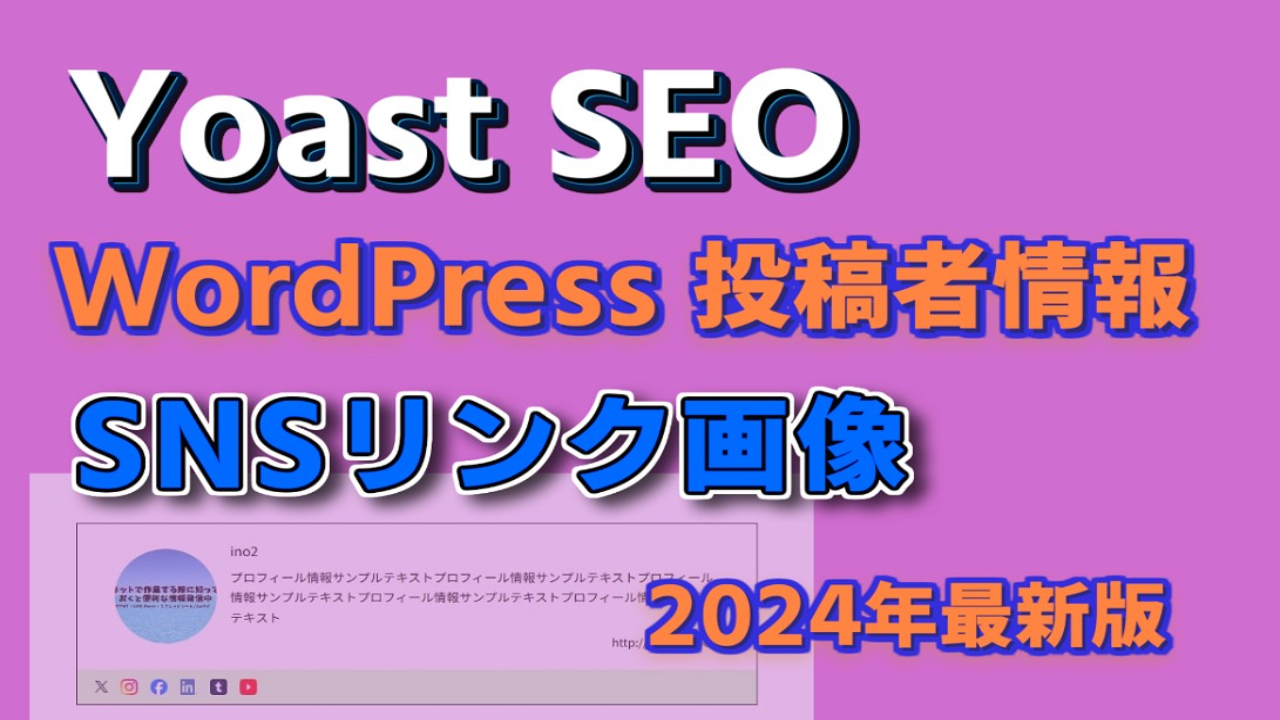
WordPressの記事で投稿者情報を表示する方法をやっていきます。
今回は、Yoast SEOを有効化した時にプロフィールページに追加されるフィールドの情報を使います。
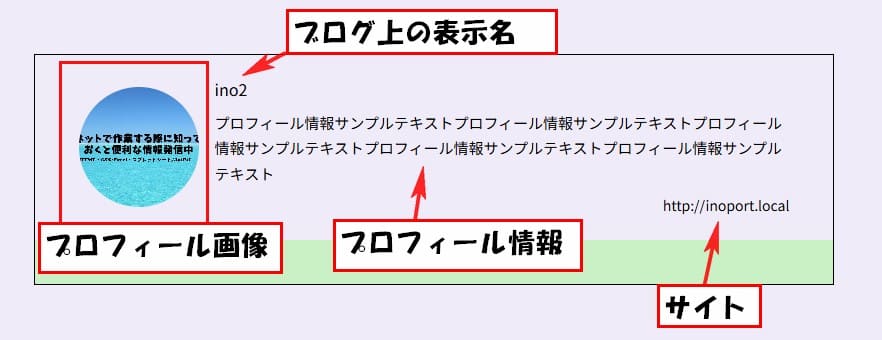
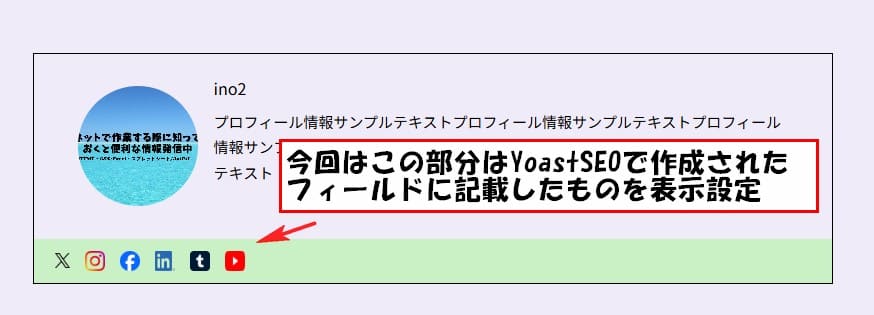
作成したのはこんな感じのものを作成しました。
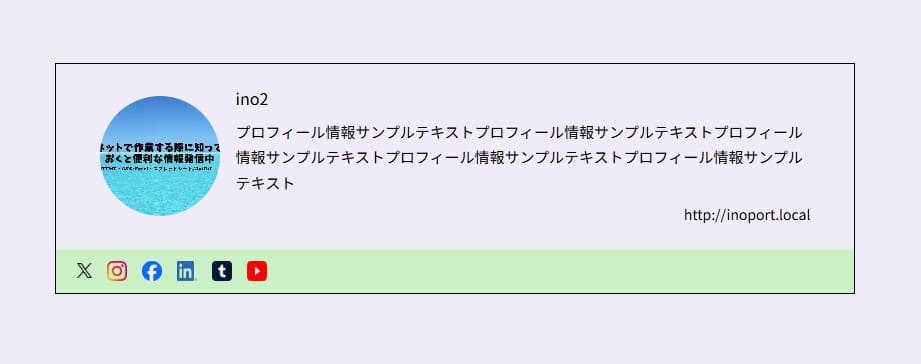
上部のブログ上の表示名・プロフィール情報・サイトの表示作成
上部の画像部分はプロフィールページで登録したプロフィール写真を表示するようにしてます。
この部分は、いろんな方法があります。
今回は自作でプロフィール写真登録機能を追加してそれを表示してます。
この記事では、プロフィール写真を表示させるコードをかいてます。
投稿者情報の表示方法やSNSリンクの設定を進める際、安定した動作環境を持つレンタルサーバー選びも重要です。
私も使用しているエックスサーバーは、高速で信頼性が高く、WordPressの運用に最適です。
今ならエックスサーバーに新規登録すると、お得なキャンペーンも実施中です。
この機会にぜひ試してみてください!
この自作でプロフィール写真を登録できるようにする方法は、また違う記事に書こうと思ってます。
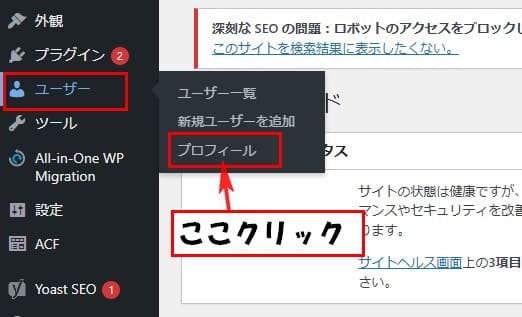
ブログ上の表示名・プロフィール情報・サイトの表示は プロフィールページに標準でついてる フィールドに記載したものを表示する設定になります。
プロフィールページはユーザー→プロフィールをクリックで開くことができます。
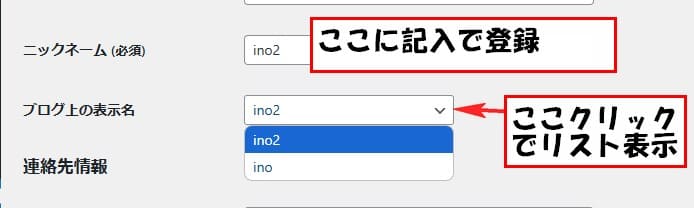
下の方にスクロールすると、ニックネーム (必須)とブログ上の表示名のフィールドがあります。
ニックネーム (必須)の所で記入して保存したものが、下のブログ上の表示名の所で選択できるようになります。
ブログ上の表示名で設定した名前をブログ上の表示名の場所に表示するようにしてます。
次にサイトはプロフィールページのサイトの所に記入したのを表示するようにしてます。

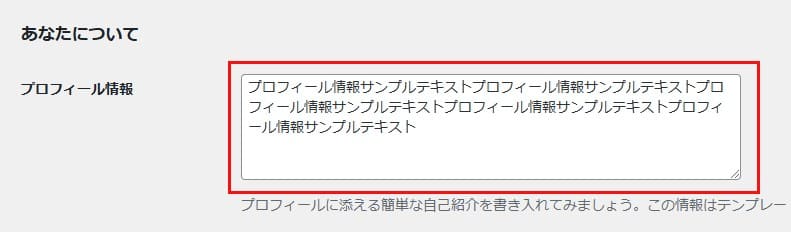
次にプロフィール情報の場所は、あなたについての場所のプロフィール情報の所に記入したものを表示するようにしてます。
ブログ上の表示名・プロフィール情報・サイトの表示用コード
PHP
<section class="profile-section">
	<div class="profile-information">
		<div class="profile-wrap">
			<!-- /*
			投稿者登録画像をページに表示
			============================ */ -->
			<div class="profile-image">
				<?php
					$author_id = get_post_field('post_author', get_the_ID());
					$custom_image_id = get_user_meta($author_id, 'custom_user_image_id', true);
					$custom_image_url = $custom_image_id ? wp_get_attachment_url($custom_image_id) : '';

				if ($custom_image_url) {
						echo '<img src="' . esc_url($custom_image_url) . '" alt="プロフィール画像" style="width: 100%; height: 100%; border-radius: 50%;">';
				} else {
						// デフォルトのアバター画像を表示
						echo get_avatar(get_post_field('post_author', get_the_ID()), 130);
				}
				?>
			</div>

			<!-- /*
			投稿者名・詳細・SNSリンクを投稿者情報をページに表示
			============================ */ -->
			<div class="profile-text-wrap">
				<!-- 投稿者の名前を表示 -->
				<?php if ($display_name = get_the_author_meta('display_name', get_post_field('post_author', get_the_ID()))) : ?>
					<h3 class="profile-name"><?php echo esc_html($display_name); ?></h3>
					<?php endif; ?>

					<!-- 投稿者のプロフィール情報を表示 -->
					<?php if ($description = get_the_author_meta('description',get_post_field('post_author',get_the_ID()))) : ?>
						<p class="profile-text"><?php echo esc_html($description); ?></p>
					<?php endif; ?>

					<!-- 投稿者のウェブサイトを表示 -->
					<?php
					$user_id = get_post_field('post_author', get_the_ID());
					$user_url = get_the_author_meta('user_url', $user_id);
					?>

					<?php if ($user_url) : ?>
				<div class="link blogdetail-link">
					<div class="external_link official_link">
						<a href="<?php echo esc_url($user_url); ?>" target="_blank" rel="noopener noreferrer">
							<?php echo esc_html($user_url); ?>
						</a>
					</div>
				</div>
					<?php endif; ?>
			</div>
		</div>
CSS (レスポンシブ対応も軽く設定してます)
.profile-section {
  padding-top: 20rem;
}

@media (max-width: 767px) {
  .profile-section {
    padding-top: 10rem;
  }
}

.profile-information {
  width: min(100%, 800px);
  border: 1px solid #000000;
  margin-bottom: 20rem;
}

@media (max-width: 767px) {
  .profile-information {
    margin: 0 auto;
  }
}

.profile-wrap {
  display: flex;
  justify-content: center;
  align-items: center;
  gap: 1rem;
  padding: 1.35rem 1vw;
}

@media (max-width: 767px) {
  .profile-wrap {
    display: block;
    padding: 1rem;
  }
}

.profile-image {
  width: min(16vw, 120px);
  height: min(16vw, 120px);
  border-radius: 50%;
}

.profile-image img {
  width: 100%;
  height: 100%;
  object-fit: cover;
  border-radius: 50%;
}

.profile-text-wrap {
  width: 75%;
  line-height: 1.7;
  text-align: left;
  color: #000000;
}

@media (max-width: 768px) {
  .profile-text-wrap {
    width: 100%;
    margin-top: 1rem;
    line-height: 1.5;
  }
}

.profile-name {
  font-size: clamp(14px, 1.43vw, 16px);
  margin-bottom: .4rem;
}

.profile-text {
  font-size: clamp(13px, 1.43vw, 15px);
  word-break: break-all;
  margin-bottom: .5rem;
}

.official_link a{
  text-align: right;
  font-size: clamp(12px, 1.43vw, 14px);
  transition: .8s;
}

.official_link a:hover {
  opacity: .5;
}
Yoast SEOで追加されたSNS情報の表示設定
下部のSNSリンク部分は、Yoast SEOを有効化したら自動で追加される SNS情報登録フィールドに記載した SNSのリンクのみ表示する設定にしてます。
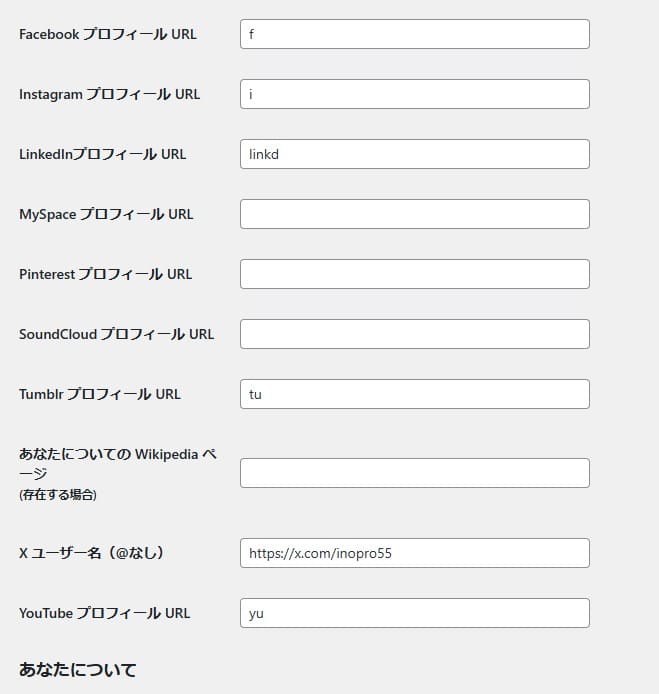
この部分がYoast SEOで追加されたsns登録フィールドになります
ここで記入したsnsの画像をリンク付きで表示するようにしてます
ここに 投稿者情報の所に表示したいsnsのアドレスを記入します
SNSリンク部分のコード
PHP
		<div class="profilr-snslink-wrap">
			<?php
			$user_id = get_post_field('post_author', get_the_ID());
			$sociak_links = [
				'x_pofile' => [
					'url' => get_the_author_meta('twitter', $user_id),
					'icon' => get_template_directory_uri() . '/imgs/x_logo.png',
					'class' => 'sns-icon profile-x'
				],
				'instagram_pofile' => [
					'url' => get_the_author_meta('instagram', $user_id),
					'icon' => get_template_directory_uri() . '/imgs/instagram_logo.png',
					'class' => 'sns-icon profile-instagram'
				],
				'facebook_pofile' => [
					'url' => get_the_author_meta('facebook', $user_id),
					'icon' => get_template_directory_uri() . '/imgs/facebook_logo.png',
					'class' => 'sns-icon profile-facebook'
				],
				'linkedin_pofile' => [
					'url' => get_the_author_meta('linkedin', $user_id),
					'icon' => get_template_directory_uri() . '/imgs/linkedin_logo.png',
					'class' => 'sns-icon profile-linkedin'
				],
				'tumblr_pofile' => [
					'url' => get_the_author_meta('tumblr', $user_id),
					'icon' => get_template_directory_uri() . '/imgs/tumblr_logo.png',
					'class' => 'sns-icon profile-tumblr'
				],
				'youtube_pofile' => [
					'url' => get_the_author_meta('youtube', $user_id),
					'icon' => get_template_directory_uri() . '/imgs/youtube_logo.png',
					'class' => 'sns-icon profile-youtube'
				]
				];

				// 登録されたSNSリンクがあるかどうかを確認
				$has_social_links = false;
				foreach ($sociak_links as $link) {
					if (!empty($link['url'])) {
						$has_social_links = true;
						break;
					}
				}
				?>

				<?php if ($has_social_links) : ?>
					<ul class="prolile-snslink">
						<?php foreach ($sociak_links as $link) : ?>
							<?php if (!empty($link['url'])) : ?>
								<li>
									<a href="<?php echo esc_url($link['url']); ?>" target="_blank" rel="noopener noreferrer">
										<img src="<?php echo esc_url($link['icon']); ?>" alt="" class="<?php echo esc_attr($link['class']); ?>">
									</a>
								</li>
							<?php endif; ?>
						<?php endforeach; ?>
					</ul>
				<?php endif; ?>
		</div>
	</div>
</section>
表示設定する際の注意点
この動画を作成した時点では、Xを表示する場合 情報を取得するIDはtwitterで指定しないと取得できない状態でした。この部分は注意が必要になります。
CSS
.profilr-snslink-wrap {
  min-height: 34px;
  background-color: #caf0c6;
}

.prolile-snslink {
  display: flex;
  justify-content: flex-start;
  align-items: center;
  gap: 15px;
  padding: 12px 21px;
}

.prolile-snslink img {
  width: min(6vw, 20px);
  height: min(6vw, 20px);
  transition: .8s;
}

.prolile-snslink img.profile-x {
  width: min(4vw, 15px);
  height: min(4vw, 15px);
}

.prolile-snslink img:hover {
  opacity: .5;
}
これで、SNSリンクの表示も完了です。
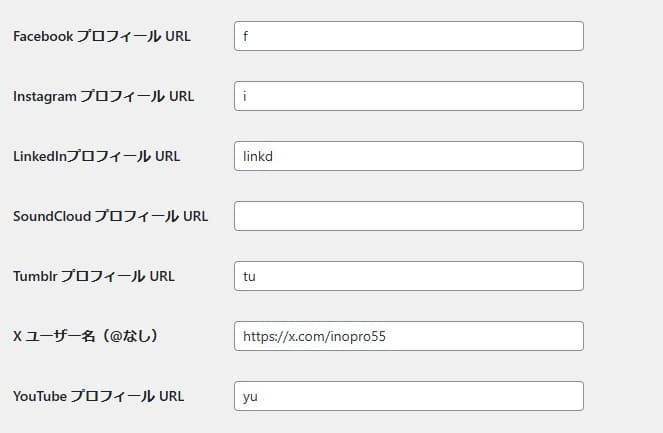
使用しないSNS情報登録フィールド非表示設定
最後に使わないSNS情報登録フィールドは邪魔になるので、非表示にする方法も書いときます。
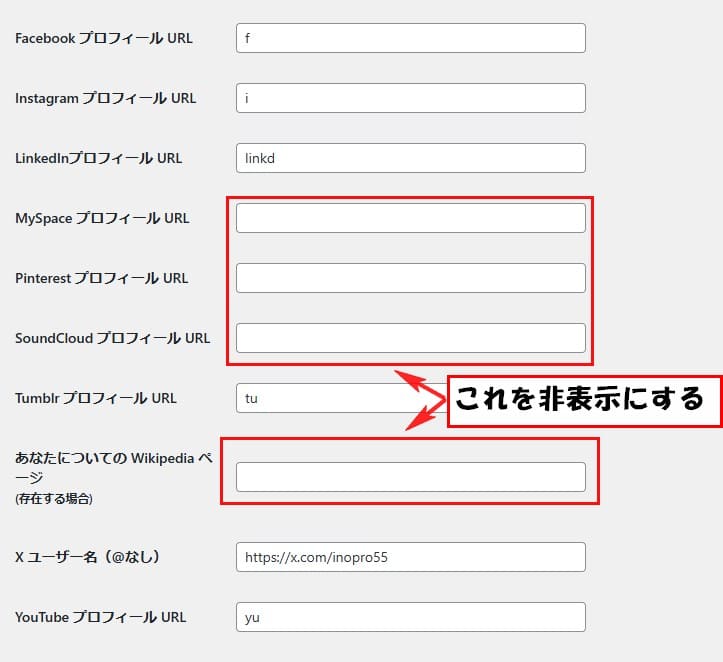
設定は、functions.phpにコードを書くことで設定が可能です。
今回書いたコードは下記になります。
functions.php
function hide_yoast_seo_social_fields() {
	echo '<style>
		tr.user-myspace-wrap,
		tr.user-pinterest-wrap,
		tr.user-soundCloud-wrap,
		tr.user-wikipedia-wrap {
		display: none; !important;
		}
	</style>';
}
add_action('admin_head', 'hide_yoast_seo_social_fields');
これで使用してないのは非表示にできました。
これで投稿者情報の表示部分の作成は完了です。
よかったら、参考にしてください。


コメント