テーブル表組みのやり方。border-collapse・table-layoutについて。
HTMLでテーブルを作成する時は、table タグで作成可能。
rowspan とcolspan についても書いてます。
シンプルな、テーブル作成コード例
1列目を見出しにした場合
HTML
    <table class="test01">
      <tr>
        <th>見出しのセル</th>
        <td>見本</td>
        <td>見本見本テスト</td>
        <td>見本見本テスト2</td>
        <td>見本見本テスト3</td>
      </tr>
      <tr>
        <th>見出しのセル</th>
        <td>見本</td>
        <td>見本見本テスト</td>
        <td>見本見本テスト2</td>
        <td>見本見本テスト3</td>
      </tr>
      <tr>
        <th>見出しのセル</th>
        <td>見本</td>
        <td>見本見本テスト</td>
        <td>見本見本テスト2</td>
        <td>見本見本テスト3</td>
      </tr>
    </table>
CSS
.test01 {
  width: 100%; /*表の横幅指定。親要素の幅いっぱいで伸縮*/
  table-layout: fixed; /*各セルの幅を均等に分ける*/
  border-collapse: collapse; /*各セルの線の表示設定*/
  }
  .test01 th,
  .test01 td {
  padding: 10px; /*セルの中の文字の周りの余白設定*/
  border: 1px solid black; /*縦線横線のサイズ・線の種類・カラー設定*/
  }
  .test01 th {
  background-color: #0bd; /*セルのカラーの設定*/
  }

1行目を見出しにした場合
HTML
<table class="test3">
    <tr>
      <th class="midasi1">見出し1</th>
      <th class="midasi2">見出し2</th>
      <th class="midasi3">見出し3</th>
    </tr>
    <tr>
      <td>トップ</td>
      <td>テキスト1</td>
      <td>1000</td>
    </tr>
    <tr>
      <td>トップ2</td>
      <td>テキスト2</td>
      <td>2000</td>
    </tr>
    <tr>
      <td>トップ3</td>
      <td>テキスト3</td>
      <td>3000</td>
    </tr>
  </table>
CSS
.test3 {
  width: 100%;
  table-layout: fixed;
  border-collapse: separate; /*こちらはセルの線を重ねてない*/
  }
  .test3 th,
  .test3 td {
  padding: 10px;
  border: 1px solid black;
  }
  .test3 th {
  background-color: #0bd;
  }

table-layout で表の項目のレイアウト設定
表の各項目のレイアウトの設定は table-layoutを
使って設定が可能です。
table-layout: auto;
最初の列の幅を指定した場合、後ろの列はセルの中身の
サイズに合わせて、自動で列の幅を決めてくれる。
HTML
  <table class="test03">
    <tr>
      <th>見出しのセル</th>
      <td>見本</td>
      <td>見本見本テスト</td>
      <td>見本見本</td>
    </tr>
    <tr>
      <th>見出しのセル</th>
      <td>見本</td>
      <td>見本見本テスト</td>
      <td>見本見本</td>
    </tr>
    <tr>
      <th>見出しのセル</th>
      <td>見本</td>
      <td>見本見本テスト</td>
      <td>見本見本</td>
    </tr>
  </table>
CSS
.test03 {
  width: 800px;
  table-layout: auto;
  border-collapse: separate;
  }
  .test03 th {
  width: 200px;
  }
  .test03 th,
  .test03 td {
  padding: 10px;
  border: 1px solid black;
  }
  .test03 th {
  background-color: #0bd;
  }

table-layout: fixed;
最初の列の幅を指定した場合、後ろの列は均等で設定される。
今回の場合は、全体の幅が900pxで、thの幅の指定200px
なので、後ろのサイズは残り700pxで均等割になってる。
HTML
<table class="test04">
    <tr>
      <th>見出しのセル</th>
      <td>見本</td>
      <td>見本見本テスト</td>
      <td>見本見本</td>
    </tr>
    <tr>
      <th>見出しのセル</th>
      <td>見本</td>
      <td>見本見本テスト</td>
      <td>見本見本</td>
    </tr>
    <tr>
      <th>見出しのセル</th>
      <td>見本</td>
      <td>見本見本テスト</td>
      <td>見本見本</td>
    </tr>
  </table>
CSS
.test04 {
width: 900px;
table-layout: fixed;
border-collapse: separate;
}
.test04 th {
width: 200px;
}
.test04 th,
.test04 td {
padding: 10px;
border: 1px solid black;
}
.test04 th {
background-color: #0bd;
}

2列のパターンtable-layout: auto;で指定
全体の幅 800px th幅 200pxで指定
HTML
  <table class="test05">
    <tr>
      <th>見出</th>
      <td>見本見本テスト</td>
    </tr>
    <tr>
      <th>見出</th>
      <td>見本見本テスト</td>
    </tr>
    <tr>
      <th>見出</th>
      <td>見本見本テスト</td>
    </tr>
  </table>
CSS
.test05 {
  width: 800px;
  table-layout: auto;
  border-collapse: separate;
  }
  .test05 th {
  width: 200px;
  }
  .test05 th,
  .test05 td {
  padding: 10px;
  border: 1px solid red;
  }
  .test05 th {
  background-color: #0bd;
  }

2列のパターンtable-layout: fixed;で指定
全体の幅 800px th幅 100pxで指定
HTML
  <table class="test06">
    <tr>
      <th>見出</th>
      <td>見本見本テスト</td>
    </tr>
    <tr>
      <th>見出</th>
      <td>見本見本テスト</td>
    </tr>
    <tr>
      <th>見出</th>
      <td>見本見本テスト</td>
    </tr>
  </table>
CSS
.test06 {
width: 800px;
table-layout: fixed;
border-collapse: separate;
}
.test06 th {
width: 100px;
}
.test06 th,
.test06 td {
padding: 10px;
border: 1px solid red;
}
.test06 th {
background-color: #0bd;
}

border-collapse で表の枠線の設定
border-collapse: collapse;
セルの隣の線はくっついて表示される。
セル同士の間が1本の線になる。
HTML
  <table class="test07">
    <tr>
      <th>見出</th>
      <td>見本見本テスト</td>
    </tr>
    <tr>
      <th>見出</th>
      <td>見本見本テスト</td>
    </tr>
    <tr>
      <th>見出</th>
      <td>見本見本テスト</td>
    </tr>
  </table>
CSS
.test07 {
  width: 400px;
  table-layout: auto;
  border-collapse: collapse;
  }
  .test07 th {
  width: 100px;
  }
  .test07 th,
  .test07 td {
  padding: 10px;
  border: 1px solid red;
  }
  .test07 th {
  background-color: #0bd;
  }

border-collapse: separate;
セルの隣の線はくっつかずに表示される。
セル同士の間が2本線になる。
HTML
  <table class="test08">
    <tr>
      <th>見出</th>
      <td>見本見本テスト</td>
    </tr>
    <tr>
      <th>見出</th>
      <td>見本見本テスト</td>
    </tr>
    <tr>
      <th>見出</th>
      <td>見本見本テスト</td>
    </tr>
  </table>
CSS
.test08 {
  width: 400px;
  table-layout: fixed;
  border-collapse: separate;
  }
  .test08 th {
  width: 100px;
  }
  .test08 th,
  .test08 td {
  padding: 10px;
  border: 1px solid red;
  }
  .test08 th {
  background-color: #0bd;
  }

この枠線の設定方法知ってると、表のレイアウトも
簡単に操作できるので表現の幅が広がりますよ。
colspan・rowspanを使ってのレイアウト指定はやっちゃダメ
colspan・rowspanを使っても上記のような表示は可能。
でもレイアウトを指定するのはCSSで設定して、HTMLではやらない。
同じ表の中で、複数行・複数列がありそこに合わせるために
colspan・rowspanでセルを結合する場合はOK。
例題
セルのサイズを広げる目的で、colspanを使ってるのでダメ!
HTML
<table class="test09">
    <tr>
      <th>見出</th>
      <td colspan="3">見本</td>
    </tr>
    <tr>
      <th>見出</th>
      <td colspan="3">見本</td>
    </tr>
    <tr>
      <th>見出</th>
      <td colspan="3">見本</td>
    </tr>
  </table>
CSS
.test09 {
  width: 400px;
  border-collapse: collapse;
  }
  .test09 th,
  .test09 td {
  padding: 10px;
  border: 1px solid red;
  }
  .test09 th {
  width: 100px;
  background-color: #0bd;
  }

セルの数に合わせるために、colspanを使ってセルのサイズを
合わせてる。こんな場合はOKです。
HTML
<table class="test10">
    <tr>
      <th>見出</th>
      <td colspan="3">見本見本テスト</td>
    </tr>
    <tr>
      <th>見出</th>
      <td>見本</td>
      <td>見本</td>
      <td>見本</td>
    </tr>
    <tr>
      <th>見出</th>
      <td>見本</td>
      <td>見本</td>
      <td>見本</td>
    </tr>
  </table>
CSS
.test10 {
  width: 400px;
  border-collapse: collapse;
  }
  .test10 th,
  .test10 td {
  padding: 10px;
  border: 1px solid red;
  }
  .test10 th {
  width: 100px;
  background-color: #0bd;
  }

セルに色を付ける方法
セルに色を付ける方法は background-colorで指定すると出来ます。
.test10 th {
  width: 100px;
  background-color: #0bd;
  }
今回の場合は、thを指定して#0bdの色を付けてます。
個別で色の変更をする場合は、classを細かくあてて
その、class 単位で指定するとカラフルなのも可能です。
CodePenでも確認可能です
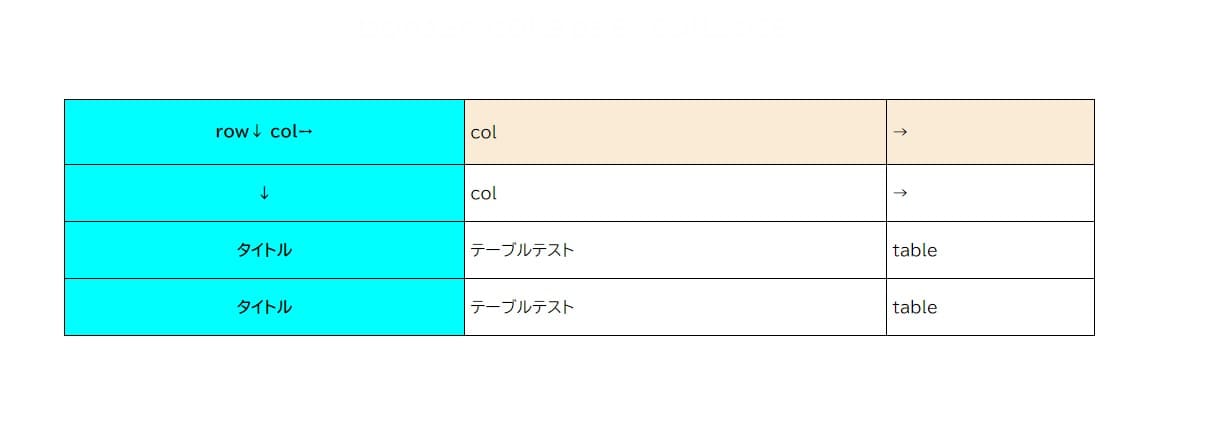
追加 ここ以降の説明で使用してるtable シンプルなコード
HTML
 <table>
    <caption>
      <h2>テーブルテスト<br>table-layout:auto;<br>border-collapse:collapse;</h2>
    </caption>
    <tr>
      <th>row↓col➙</th>
      <td>col</td>
      <td>→</td>
    </tr>
    <tr>
      <th>↓</th>
      <td>col</td>
      <td>→</td>
    </tr>
    <tr>
      <th>タイトル</th>
      <td>テーブルテスト</td>
      <td>table</td>
    </tr>
    <tr>
      <th>タイトル</th>
      <td>テーブルテスト</td>
      <td>table</td>
    </tr>
  </table>
rowspan と colspan
tableでよく見るのが、rowspan colspan
これは、tableのセルの結合表示指定方法になる。
rowspan=”2″ 縦方向2つのセル結合の意味
colspan=”2″ 横方向に2つのセル結合の意味

tableの横幅の指定
table-layout で指定可能。 auto とfixed あり。
table-layout: auto; コンテンツの量によって自動で調整
table-layout: fixed; コンテンツ量によって均等配分
tableの枠線の指定
border-collapse で指定可能 collapse と separate
border-collapse: collapse; 1本の線のように見える
border-collapse: separate; 各要素に線が入るので2重になって見える
separateの指定をすると、各線の間隔の調整も可能。
border-spacing: 60px 40px; こんな感じで指定可能
border-spacing: 縦幅 横幅 ;

table 基本のCSS
CSS
table {
width: 80%;
border-collapse: collapse;
table-layout: auto;
}
table th,
table td {
border: 1px solid #000;
padding: 20px 5px;
}
table th {
background-color: aqua;
}
table tr:first-child {
background-color: antiquewhite;
}
このCSSで下図のようなテーブルが出来る。


コメント