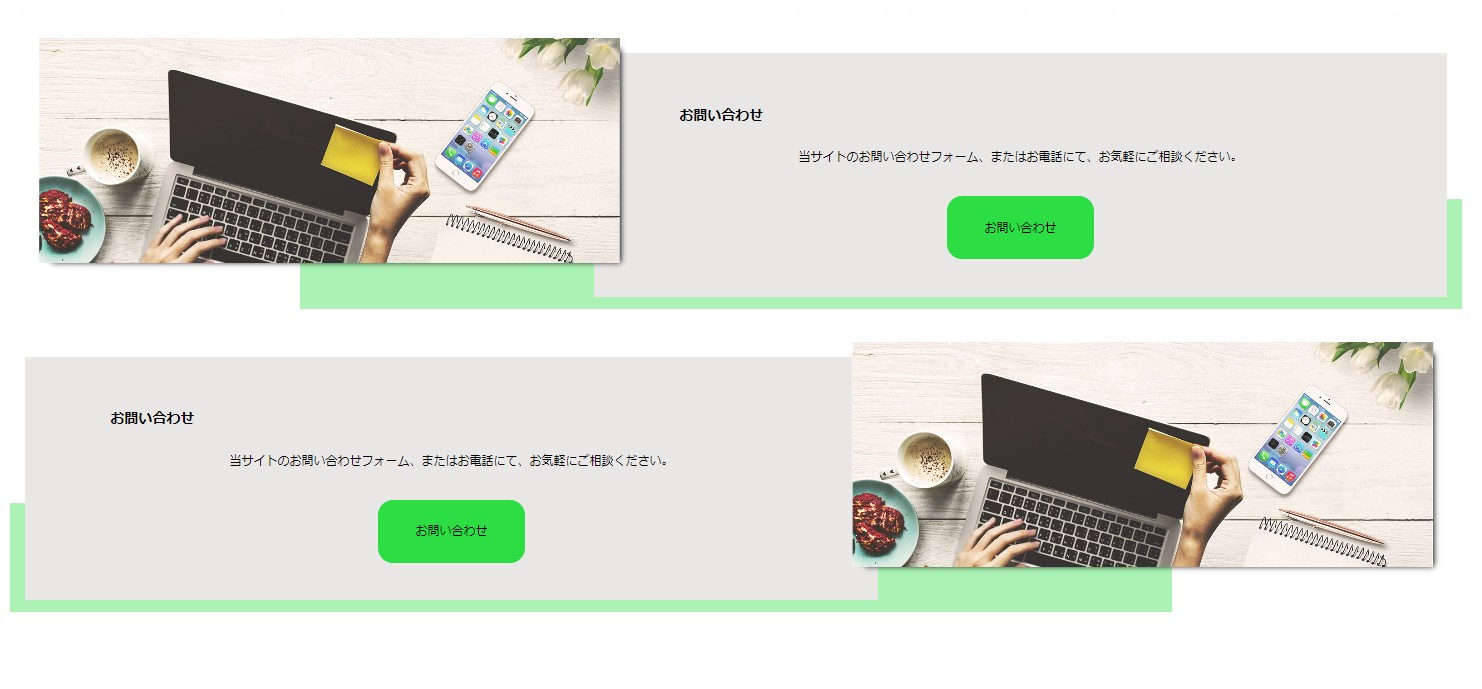
画像とテキストボックスを横並びにして重ね
1枚の画像を少し上にずらした感じで配置。
後ろにラインを入れたデザインをコーディング
してみました。
後半では、親要素の幅を超えて画面いっぱいに表示
させる方法も書いてます。
今回は、positionとz-indexを使ってます。
今期作成したのは下記になります。

書いたコードも掲載してるので
参考にしてください。
またコーディングはいろんな書き方が
あるので、今回は一例になります。
書いたHTML・CSSのコード
HTML
<body>
  <div class="process-contents">
    <div class="process-wrap">
      <div class="text-content">
        <div class="inner">
          <h3 class="process-headline">
            お問い合わせ
          </h3>
          <p class="process-text">
            当サイトのお問い合わせフォーム、またはお電話にて、お気軽にご相談ください。
          </p>
          <a href="#" class="process-btn">お問い合わせ
          </a>
        </div>
      </div>
      <img src="./images/pro.jpg">
    </div>
  </div>
</body>
書いたCSSコード
CSS
@charset "utf-8";
*{
box-sizing:border-box;
}

.process-contents{
  position:relative;
  z-index:1;
}

.process-contents:after{
  content:"";
  width:80%;
  height:40%;
  background-color:rgba(44,222,68,.4);
  position:absolute;
  right:0;
  bottom:1%;
  z-index:-1;
}

.process-wrap{
  display:flex;
  flex-direction:row-reverse;
  padding:20px;
}

.process-wrap img{
  width:40%;
  height:300px;
  object-fit:cover;
  vertical-align:bottom;
  position:absolute;
  top:0;
  left:2%;
  z-index:2;
  box-shadow:9px7px8px-8px#000;
}

.text-content{
  width:60%;
  background-color:rgb(233,230,230);
  text-align:center;
  padding:50px0;
}

.inner{
  width:80%;
  margin:auto;
}

.process-headline{
  text-align:left;
}

.process-text{
  margin:30px040px0;
}

a{
  text-decoration:none;
}

.process-btn{
  display:inline-block;
  padding:30px50px;
  background-color:rgb(44,222,68);
  border-radius:20px;
  color:#000;
}
今回は、画像をpositionで浮かせて配置してます。
画像と、テキストボックスをレスポンシブ時の
配置も考慮もあり、row-reverse使用。
背後の横棒は、大枠の疑似要素で
配置することで、画面の端に固定。
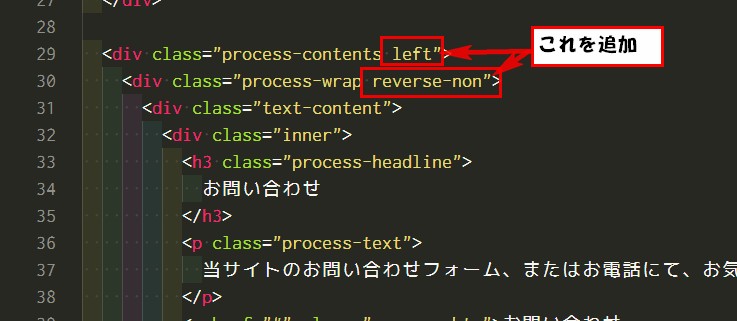
画像とテキストボックスの配置反転追加

今回は先ほど書いたコードに、classを
2か所追加で可能です。
<div class=”process-contents”>に
leftを追加しました。
<div class=”process-wrap”>に
reverse-nonを追加しました。

HTML
<body>
  <div class="process-contents">
    <div class="process-wrap">
      <div class="text-content">
        <div class="inner">
          <h3 class="process-headline">
            お問い合わせ
          </h3>
          <p class="process-text">
            当サイトのお問い合わせフォーム、またはお電話にて、お気軽にご相談ください。
          </p>
          <a href="#" class="process-btn">お問い合わせ
          </a>
        </div>
      </div>
      <img src="./images/pro.jpg">
    </div>
  </div>

  <div class="process-contents left">
    <div class="process-wrap reverse-non">
      <div class="text-content">
        <div class="inner">
          <h3 class="process-headline">
            お問い合わせ
          </h3>
          <p class="process-text">
            当サイトのお問い合わせフォーム、またはお電話にて、お気軽にご相談ください。
          </p>
          <a href="#" class="process-btn">お問い合わせ
          </a>
        </div>
      </div>
      <img src="./images/pro.jpg">
    </div>
  </div>
</body>
CSSは、3つ指定追加で完了です。
/* 背後の横棒を左に変更 */
.process-contents.left:after{
left: 0;
}

/* reverse解除 */
.process-wrap.reverse-non{
flex-direction: row;
}

/* 画像右から2%の場所に変更 */
.process-wrap.reverse-non img{
left: 98%;
transform: translateX(-100%);
}
コンテンツの余白指定も追加してます。
.process-contents{
margin-top: 40px;
}

.process-contents:first-child{
margin-top: 0;
}
CSS
@charset "utf-8";
*{
box-sizing:border-box;
}

.process-contents{
  position:relative;
  z-index:1;
  margin-top:40px;
}

.process-contents:first-child{
  margin-top:0;
}

.process-contents:after{
  content:"";
  width:80%;
  height:40%;
  background-color:rgba(44,222,68,.4);
  position:absolute;
  right:0;
  bottom:1%;
  z-index:-1;
}
/* 背後の横棒を左に変更 */
.process-contents.left:after{
  left:0;
}

.process-wrap{
  display:flex;
  flex-direction:row-reverse;
  padding:20px;
}
/* reverse解除 */
.process-wrap.reverse-non{
  flex-direction:row;
}

.process-wrap img{
  width:40%;
  height:300px;
  object-fit:cover;
  vertical-align:bottom;
  position:absolute;
  top:0;
  left:2%;
  z-index:2;
  box-shadow:9px7px8px-8px#000;
}
/* 画像右から2%の場所に変更 */
.process-wrap.reverse-non img{
  left:98%;
  transform:translateX(-100%);
}

.text-content{
  width:60%;
  background-color:rgb(233,230,230);
  text-align:center;
  padding:50px0;
}

.inner{
  width:80%;
  margin:auto;
}

.process-headline{
  text-align:left;
}

.process-text{
  margin:30px040px0;
}

a{
  text-decoration:none;
}

.process-btn{
  display:inline-block;
  padding:30px50px;
  background-color:rgb(44,222,68);
  border-radius:20px;
  color:#000;
}
これで完了です。
他にも人によって実装方法はいろいろです。
1例として参考にしていただければ幸いです。
この方法では、帯は親要素のコンテナ内に収まります。
後部の帯を親要素に関係なく画面いっぱいに広げる方法
今回テキストBoxの後ろにある帯、上記のコードでは、
親要素の幅までになります。
この帯を、親要素より外側画面いっぱいに表示させる
方法もあります。
今回の場合で上手く出来た方法も参考で書いていきます。
今回の場合は、右側と左側それぞれ片方に伸びる設定。
帯びの長さが画面半分くらいで設定しました。
右側に伸びる設定のコード追加

後部の帯の指定してるクラスに下記のコード追加。
width:68vw;は帯の長さの指定してます。
基本はwidth:100vw;みたいなのですが、今回そのコードだと
画面幅広げた時にヘンな感じになるので、色々数値変えて
この数値に落ち着きました。
.process-contents:afterに
width:68vw;
margin-right: calc(50% - 50vw);
左側に伸びる場合のコード

.process-contents.left:afterに
width: 68vw;
margin-left: calc(50% - 50vw);
それぞれ追加で画面いっぱいに伸びます。
ただこのままだと、下にスクロールバーが表示される場合があります。
そのスクロールバーを消したい場合は、上記の指定をした
要素の、祖父要素のCSSに下記のコードを追加すると
スクロールバーが消えました。
今回の場合は、sectionが祖父要素になるので
section{
position: relative;
overflow: hidden;
}
これで、うまくいきました。
ただ、個人的な感じですがsectionに指定するのじゃなく
別に祖父要素になるようなclassを作成して、そこに指定
する方がいいのかなとも感じました。
この、親要素の幅を超えて画面いっぱいに表示させる
設定の方法、よく見かけるので頭の片隅にでも置いておくと
いいです。
左右両方に広げる場合は

width: 100vw;
margin: 0 calc(50% - 50vw);
で出来ました。
marginの設定で、両サイド・右サイド・左サイドそれぞれ
広げる方向の指定をしています。
参考にしていろいろ数値変更してみてください。
YouTube動画はこちら


コメント